Showing posts with label virtualbox. Show all posts

Monday, March 11, 2013

VirtualBox Headless Server vs Vmware ESXi

 I've started to notice a few twitter and blog posts about running VirtualBox headless as a VM server. In short, have a dedicated machine to host and run VM guests that can be managed via a web console.


Well, there is no such thing as a VirtualBox server. VirtualBox is a Type 2 Hypervisor that runs as an application in a hosted operating system.A true virtualization server would be a Type 1 variety like VMware ESXi or Citrix XenServer. However, that hasn't stop many people from running VirtualBox headless with a web based front end management tool.

In fact, in certain instances, it is a great way to recycle old machines.  Some Type 1 hypervisors have certain hardware requirements that exclude a large number of older machines. For example,VT-x and certain virtualization features of the CPU and chipset are absolute requirements. VirtualBox tends to be more forgiving. I have quite a few old Dell rack servers (1950,2850,2950s) that don't quite meet many of the VMware HCL (Hardware Compatibility List). In fact, depending on the generation, a few of them wont even install ESXi 3 or 4. Hence, despite what people say, you can run VirtualBox as a headless VM server.

There are plenty ways of setting up a VirtualBox server. The most likely way is to install a minimal footprint Linux distro like CentOS, Debian or Ubuntu and install PHPVirtualBox. PHPVirtualBox is a PHP-based web base front end that employs AJAX and PHP to manage VirtualBox.


Here are some relevant links:
https://code.google.com/p/phpvirtualbox/

A step by step how-to:
http://www.howtoforge.com/managing-a-headless-virtualbox-installation-with-phpvirtualbox-on-nginx-ubuntu-12.04

I have a few headless VirtualBox headless machines under Debian and they work quite good for their intended purposes. I run low-level, non mission critical things like Squid, Nagios, and other  network/intrusion monitoring systems.

Benefits of VirtualBox headless over something like ESXi.

The key gain with VBOX (VirtualBox) is familiarity and cross platform. VBOX is free and works across platforms - Linux, OSX, Windows. You don't even have to run a Linux host. You can choose an old MacMini with OSX if you like. You can download images, build appliances and they pretty much work on any machine by copying the files. Most of the people I know who do desktop virtualization use VirtualBox because it is free and cross platform.

You get to test and stage your VM guests on your workstation or laptop. You can build your great web LAMP app on your laptop and easily deploy by copying via something simple as a USB stick. You can simply SSH into your VirtualBox host, mount the drive and copy your files and be ready in a few minutes. When you have 10-20GB VM disks, it is faster to sneakernet the files via USB than over the internet. ESXi does not recognize inserted USB devices so you have to remotely copy files over to your VMFS data-stores. This requires setting up NFS/iSCSI shares , SFTPing your files, or use the Windows application to upload your files. For a non-window user, this is a hassle. In short, I find it easier to get VMs loaded onto the VirtualBox.

Next, the front end is standard web interface and works on phones and tablets using any modern browser. The web app is amazingly well done. You can build VMs from scratch, clone guests, start and stop VMs. If you are familar with the VBoxManage terminal commands, you can SSH into to your host server and manage from the console quite easily. I teach junior developers and have a VBOX machine loaded with a bunch of turnkey LAMP iso. They get to learn to install/build lightweight Linux servers using the web browser interface to VirtualBox.

I also like the different networking options of Virtual Box (bridge,nat,host-only).  Unlike ESXi, your guests can run under NAT mode; meaning they do not require a dedicated IP or actual access to a network interface.  This is handy if you are running something like NAGIOS that doesn't need to be access by the outside world. Nagios works fine behind a NAT. Lastly, the biggest advantage is RDP (Remote Desktop Protocol) console access. I don't need a dedicate app to access the desktop/console of my guest machine. I can use any RDP applications including those found on smartphone and tablets.

ESXi is not as easy to use as VirtualBox. Datastores reside on VMFS (VMWare File Systems). If the ESXi box dies, you can only access the contents of the disk from another ESXi machine that can read VMFS. You can do FUSE-VMFS but I won't go there. With VirtualBox, you simply pull the drives to another machine with similar OS or File-system access. Backups with VirtualBox can be easily automated by the host OS. I can use rsync to copy images to remote backups easily.I'm certain VMware has some nice enterprise features for cloning/migration/etc but my post is intended for those who want to consider using the free version of ESXi.

Another big negative is managing ESXi requires a Windows machine with a dedicated VMware View application. In fact,I manage my ESXi server via Windows 98 running inside VirtualBox. I rarely use Windows and prefer not to boot out of Linux/OSX into Windows 7 just to use one application.


Now for the advantages of ESXi over VirtualBox (headless).

ESXi is a Type 1 baremetal hypervisor. It runs its own small OS that can be booted off a small USB stick. The OS is minimal and its only job is to run Virtual Machines. You don't get the overhead layer of running a host operating system. It runs much much faster without that extra layer of complexity found in Type 2 hypervisors like VirtualBox. On average, my ESXi baremetal OS consumes like 40-80 MB of RAM. The rest of the RAM are dedicated to guests VM and some overhead to manage them. Did I mention it was a small footprint? The whole server can be installed on a flash card or USB stick. It takes a total of 10 minutes to install and get ESXi up and running. With VBOX headless, you have to install the host OS, harden it, install LAMP, set permissions and modify a bunch of config files.

Most importantly, ESXi is much faster than VBOX. There are countless benchmarks on the internet if you care to look.VT-D hardware access if your hardware supports it. You can dedicate physical hardware to guest OS. For example, you can install a Windows guest to access a physical GPU video card. In short, you can run a graphical OS like Windows with hardware acceleration to a large monitor from your "headless" server. All of my experiment with VBOX headless were for low volume material. I would not entrust running a high volume web server off VirtualBox. With ESXi, I would not hesitate to use it for production.

I wont go into the hundreds of reasons why ESXi is better than VirtualBox (e.g. setting resource pools,etc) but the key thing for me is the reporting and statistics. The reporting allows me to examine my guests performance and tailor and allocate resources for their consumption needs. Before, I was allocating 512MB, 1 GB or 2GB of RAM to various "lightweight vms" in VirtualBox and had to constantly log into their consoles to monitor their performance needs. With ESXi, I can graph and visualize their needs after a few benchmarks/testing. For example, with one particular VM guest, I found out all I needed was 384MB ram and 2 CPU vs 1024MB and 1 CPU based on extended analysis.


The screenshot shows a typical scenario on how I may benchmark and prep my guest VM. This particular one is a small web app that serves 5 users and generates PDFs. My test consisted on running several concurrent hits and measuring how long it would take to generate 1500 PDFs. I was able to see the effects of different CPU and RAM settings effected my performance. In this particular example, 768MB and 2 cores was the sweet spot ( vs 2 cores/2GB RAM  or 4 core 512MB). You simply can't do this with VirtualBox.

There are also good 3rd party tool and apps with ESXi. The iPad is handy as well when used with the mobile access appliance. It is good for getting an overall picture of your host and guests. If I had the Vsphere license, I figure I could probably do a bit more.


There you have it. My thoughts on running VirtualBox headless as a VM server. I hope you enjoy the insight.


Sunday, February 17, 2013

Windows 3.1 under VirtualBox

Words can't describe the nostalgic feeling. I was never really fond of Microsoft's original major Windows operating system, 3.1. It had its uses back in the day on those old dual-scan TFT Toshiba laptops I use to run in college. I can still remember the flickers and the side trackballs. I was always an Amiga guy back then. I was the only one in college to do all my homework and work on an Amiga 1200.

Here it is running in 2013 under VirtualBox.

Notice how DOS 6.22 even recognizes my AMD FX-8320 8 core processor.


The year 2013 doesn't seem to effect to operating system. Windows can go well past any Y2K fears.


Unlike Mac OS 9, I couldn't get Windows 3.11 to run 2560x1600 on a 30" screen. I don't know what to say about the 800x600 256 colors!


Sunday, November 4, 2012

geekery of the day: Next OpenStep inside WindowMaker

Today's geekery. Openstep 4.2 running inside Virtualbox under Ubuntu 12.04 running WindowMaker (a window manager clone of NextStep).


I am trying to make a QEMU image so I can run NextStep/Openstep inside Android. Wish me luck.

Retro-computing at its best!

Wednesday, October 24, 2012

Install a GIT server in 5-10 minutes.


Did you ever want to have your own private GitHub-like repository where you can store your code and share them with others? Well, today, I will be discussing how to install a private GIT web app that takes only a few minutes to set-up. Writing this post will take longer than running this exercise.


GITLAB is a GITHUB clone built on RoR (Ruby on Rails). It is a web application designed to allow you to host your own private GIT repositories. You can go to their website and do the full install or simply install a VM appliance. It works great for storing code. It has some basic collaborative tools like sharing guests, issuing merge and issues. This is an ideal app for a small web or smartphone-app development team.

Installing via an VM appliance is the most painless way to go. No need to install a full Linux distro and setting it up.I use Turnkey Linux and you should too. It has a large library of pre-built appliances and GITLAB is one of them I use on a day-to-day basis. I have installed over four instances of GITLAB on my ESXi server.

Today, I am going to show you how easy it is to get your own private GIT repo server up in a few minutes running just VirtualBox.

Step 1. Download ISO or OVF from Turnkey Linux.
Step 2. Create New Guest inside VirtualBox
Step 3. Install, set passwords
Step 4. Reboot.

That is it.


Ok. this post was short on specifics but if you know what you are doing, you can see it only takes a few minutes. Now, there are some things to consider and I'll elaborate and you give you a more detail set of instructions in this second part of my post.

The Detailed Setup Instructions.

This is for Mac OSX and Linux users.

The most important thing about setting up a VM appliance is deciding what sort of networking you want to use. In VirtualBox and with GitLab (or any other Linux web app), there are only two choices: Bridge-Mode or Host Only. Do not use NAT mode.

Bridge Mode will make the guest act as another computer on your network. If you have a DHCP server, it will request an get an assigned IP address. The advantage to this is that the machine is available to others on your network. Your friends and colleagues can access your GIT server as well.

Host Only mode allows the host computer and guest to see each other. Only the computer running VirtualBox will see the guest. The advantage to this is if you work offline, say camping 2 weeks at Yosemite Park without WIFI, you can access your Virtual Guest. Unfortunately, since the guest does not have outside network access, it can't do things like send email notifications and the like.

Both have their advantages and disadvantages and their use case.


The second most important thing is Hostname. You need a domain name to use GITLAB. Do not rely on IP address because it may change. If you do not have a valid DNS name (one being issued by a DNS server on your network), you can fake it by using and modifying  /etc/hosts.
This is what I do. My clients (be it OSX, Linux) only need to add an entry to the host file to see my GIT server. If you are hosting this on the Internet and have your own DNS name, this you don't need to worry about it.

In my example, I will be using localgit.local.
On my machines that need to access the GIT server, I add an entry with the IP address (either DHCP or static) and my fake DNS hostname, localgit.local


That is pretty much the only two important things you need to know.

Now for the full instructions.

After downloading the Turnkey Linux iso, you will need to create a Guest OS in VirtualBox.
Choose Linux & Debian for machine Type and version.


Specify the memory you want to use. 768MB- 1GB is enough.
Specify the disk type you want to use for the virtual harddrive. I always choose VMDK because it allows me to migrate later to VMware Vshpere if I choose to migrate my build. Your choice will be your own personal preference.


Set the drive size you want. I default to 20-60GB depending on my needs and I use Thin provisioning (or let the drive dynamically allocate/grow).

Before starting up the VM, choose the ISO disk image to boot from

Next Step. Boot the VM and go through the install process.


A few notes. It will ask you how to partition the Virtual Drive. This is your call and preference. I use the second option, Guided, because it is quick. I prefer not to use LVM in the event I want to mount this virtual drive from another Virtual guest that doesn't support Linux LVM. It will guide you through the process, install the bootloader and reboot one more time before you can use it.


After the VM restarts, you can disconnect the .iSO disk image. This next process is a series of prompts from Turnkey for passwords and set-up.

You will be ask to enter

  • root password
  • mysql password
  • password for admin account (to access web site)
  • email address for admin account


Finally, you will be asked to enter the hostname/dns name for the GITLAB server. This is it.


Once finished, you will be shown a menu where you can view administrative links, change IP, reboot, etc. This concludes the installation of GITLAB.

Post Install.

If you are reading this, I assume you know the basics of GIT and how to connect to remote GIT repos.
It will be the same here, you will need to set up SSH keys. GITLAB's web interface allows you to copy-n-paste into the web browser which simply things. Some GIT apps don't even require you to generate SSH keys and generate unique ones within their respective apps.


Creating Repos.
You can migrate existing repos from your local machine and push them to GITLAB or create a new blank empty one within the web app.


As you can see here below, I can see my source code and view changes within the GITLab web interface.


It works surprisingly well with various GIT client's I've been using: SourceTree,GitBox on Mac OSX, Git-Cola, Giggle,GitG, and SmartGIT on Linux.


Some Links:


Monday, October 22, 2012

NextStep on Modern Mac

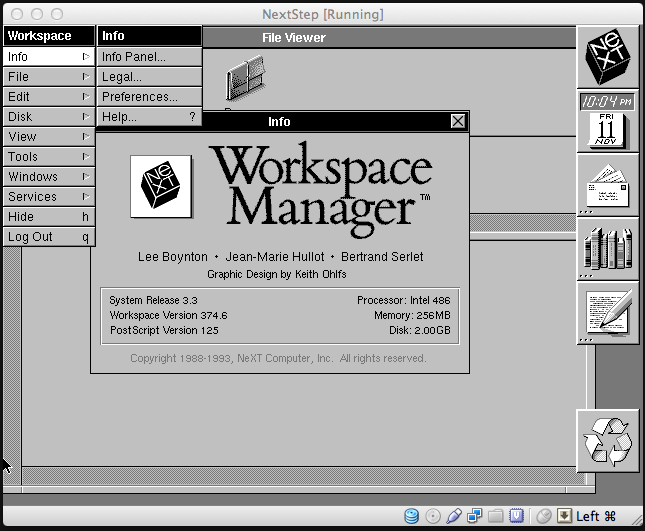
Today, I decided to kill some time by installing and running NextStep in VirtualBox. Here it is, version 3.3

NextStep is the father of Mac OS X. It was interesting to see OSX (and OpenStep) evolved from NextStep.

It is surprisingly fast.


Now, if there was only a SGI Irix 6.5 image that could run on new X86 hardware.

Saturday, July 14, 2012

Virtualization on the iPad 3 with Parallels 7


When people speak of virtualization on the iPad, they are referring to a remote desktop session to a hypervisor. In short, an iPad remote desktops into a host computer running the virtualize operating system. You can't  quite yet use an iPad as an x86 host hypervisor.

Today, I am going to review Parallels 7 Mobile Access. Parallels 7 is a popular Virtualization application for Mac OSX. The mobile client has been billed as "retina" ready so I decided to take it for a spin.

Why not VirtualBox? I'm a big fan of VirtualBox (VB). I use it on all my computers and I like the fact I can move VMs across platforms. I use VB for testing all my console OS (server builds). However, for rich GUI driven OSes, Parallels is much faster, has better Mac OS integration, and a better user experience. Most notably, it has an excellent mobile client.

In some hypervisors like VirtualBox, you can set up an RDP (Remote Desktop Protocol) port and use an RDP client on the iPad to access to virtual machine. The screenshot below shows how one can set up and configure RDP access in VirtualBox. The only problem with this method is that you must be on the same subnet as the VM host; meaning you must be in the same network. Furthermore, your experience will be totally dependent on whatever RDP client you are using. Some of the RDP apps are hit-or-miss on the App store.


Parallels Mobile Access's major key features are tunnelled access and Retina display support. Those may be two compelling reasons to choose Parallels over something like VirtualBox.

The Main menu allows you to instantly access your available VMs.


With a simple signon to Parallel's centralize servers, you can access your VM hypervisor from anywhere. Even behind firewalls, there is a secured tunnelled access (akin to reverse NAT) to your Macintosh from your iPad. Another key unique feature is the ability to start and close VMs. Compared to VirtualBox, you can remotely boot up your VM. VirtualBox can be setup using a 3rd party web based client or you can remotely start up VM from an SSH session but that is a different topic for a different day. In short, Parallels makes it easy to start and stop VM.


Parallels Mobile Access has a good set of multi-touch gestures for things like enabling the soft keyboard, right-click, double click and hiding the touch menus. Overall it works good except with a high res display, you really need to be patient and zoom-in when you deal with vertical scrollbars such as those on web browsers.


In Parallel's Modality or Window mode, you can run the VM's resolution independent of the host computer. What this means is you can pump up the resolution to as high as you want on the iPad.You can run at 1920x1200, 1680x1050 and as high as WQHD (2536x1440). With the iPad's retina screen, you can rub 2536x1440 with amazing clarity. The scaled screenshot below cannot convey the breathtaking clarity and sharpness. Running Linux Mint 13 Cinnamon, the VM display is absolutely gorgeous. Typeface, window transparencies, icons, and graphics are super sharp on the iPad 3's 9.7" HiDPi screen.


Look at the real estate available on a 2536x1440 workspace!


If you are on the same wifi network, you can pair a keyboard to an iPad 3 and have an excellent super-sharp high res mobile desktop experience.

There are many great uses on why one would use an iPad as a hypervisor client. I recently bought some old Macromedia based DVD interactive Disney learning games for my son. I failed to read the box requirement and notice it supports Windows 95-98 and Mac OS9. Running on  a live Window 7's laptop is horribly painful because most modern computers are not good at scaling to 256-colors at 800x600 resolution. On a 15" HP laptop,my son's Disney program takes up 1/4 of the screen and the rest is filled in black. Furthermore, children now are used to point-n-click touch screen tablets. He has a hard time accidentally right-clicking a mouse which often closes/quits his application. For those old apps that run horribly on new hardware, a Virtualize Win98 is the way to go. The iPad helps revitalize and access the old applications.


Sunday, July 8, 2012

Run native ARM Android Apps on your Macintosh


Back at Google I/O, Bluestacks made some headlines that announced you could run Android apps on a Mac.I took it for a spin and have something to report.


It is an early alpha so they have to work some kinks out. They have a curated set of 17 apps such as Facebook, twitter, flipboard and Angry Birds. I tried it and quickly removed it. It took 15 seconds to load which is way slow if you are running an SSD with 2 second Photoshop launches.
You can't install any other apps besides the curated apps.

It seems to be an emulator that does ARM binary to x86 translation. I heard of another similar project and decide to find out if it had a better experience.

BuilDroid is that project. Long time Mac users know what Rosetta did for the Mac OSX transition and this takes a similar approach.  If you remember, Rosetta did binary PowerPC translation for x86 and it ran reasonably well. This is the same idea but with a different architecture, ARM.
BuilDroid uses the "ARM binary emulator" from Intel ("libhoudini") to make this all work. Libhoudini is what will help Intel's Medfield ATOM platform enter the Android space.
This wan an genius idea to hack "libhoudini" and make an Android distro that runs inside VirtualBox.


The results? Well, VirtualBox booted the whole OS in less than 5 seconds vs Bluestack's 15 seconds.
You can install Google Play and download Google Apps and other applications from the market. I downloaded various apps and they work reasonably well. It has the full Ice Cream Sandwich OS with settings, notifications, and soft menu. In comparison, Bluestack is just an app launcher.

In fact, BuilDroid is faster than launching and running the Android SDK's simulator builds.

Both are early stage developments but I am leaning toward BuilDroid. I haven't tried BuilDroid on another operating system but I assume it will work just fine since it is running in VirtualBox.

Links:
http://bluestacks.com/
http://www.buildroid.org/