Tuesday, October 15, 2013

Audioengine D1 DAC. A Quick observation.

So I am now current with the cool kids and got myself a 24 bit  DAC (Digital Analog Converter). This one is the highly acclaimed and reviewed Audioengine D1.

I read all the major reviews and even scanned through the customer testimonials. Generally speaking, this gets about 5 stars and is highly rated. However, there was one review where the customer didn't see a difference. He claimed it was "audiophile snake oil." I have to heartily disagree. After the first 15 seconds, I could hear and "feel" the difference. It made everything sound better just using headphones. I tried this on my Macbook, my Thinkpad, and other computers running either OS X or Linux. They all sounded way better. The sound difference may be intangible for some but for me, it was very obvious.
There was better clarity, better soundstage, better imaging. Simply better. Was it worth $170? Yes. This is an amazing piece of high quality gear for the price.However, I was able to score one for $130 on a group buy so I was lucky and if I had to pay full price, I would do it again.

Here, you can go to Audioengine's web page and click on the numerous reviews for yourself. Great reviews in general.

The packaging was nice and you can feel the high grade build quality. 


Plugged into the USB port of my Mac, I tested them with 256bit AAC iTunes and it sounds great. Unfortunately, I only bought one. This one is intended to be used as part of an Airplay wireless speaker set-up.


Here, I connect it to the AudioEngine A5 plus speakers for use as an Apple Airplay wireless speakers. The mess of wires are a bit cumbersome so it does require some cable management.


To connect to the Apple Airport Express, you will need a 3.5mm to TOSLINK adapter. Once connected, the Airport Express outputs a digital signal.


Once I cleaned up the wiring, the speakers, DAC and Apple Express Airplay trifecta is pure  awesomeness! I'm currently using walnut bent plywood OFFI Mag end table (designed by Eric Pfeiffer) as my temporary speaker stands.

Apple Express + AudioEngine A5+  and AudioEngine D1 DAC == probably the best Airplay solution you can build under $800.


Another cheap Pogoplug Airplay Express setup

Here is another quick hacked PogoPlug running ArchLinux as a Apple Airport receiver. You can read more about Pogo and Airplay here.

Total part cost less than $50:

PogoPlug in the discount bin online $15-20.
Cheap USB powered Logitech speakers (regular $30, onsale $12).
Sabrent USB sound card dongle. $7
Extra USB stick for ArchLinux install (free from the recycle bin). You can get away with a 1-2GB USB stick if you are just using Airplay, Airprint, Google ChromePrint.

Of course, I will be using this Pogoplug for other things like Motion USB webcam surveillance. Furthermore, these speakers aren't the greatest but they don't require an extra power outlet. This is just to demonstrate that you can quickly build a very portable, self-contained Airplay sound system with a little bit of geek "elbow grease." I had a few extra Pogos and left-over parts lying around, so I figure why not. The speakers and sound card were extras in the drawer so they were brought back to life. The whole process took less than 20 minutes with an existing image I made for another PogoPlug.


There is only one AC power jack required. The speakers are USB powered by the Pogoplug itself.

I plug the USB sound card in the front so I can adjust volume and do other things more accessible.


Rear is the USB power and OS bootable USB stick.


This thing is so cheap and disposable, I can throw one in the garage or workshop.  I continue to be amaze at the ultra cool factor of the pogoplug and its ability to be versatile. If you don't care for Airplay, you can also install a Squeezebox client into one of these just as easily.


Links:

Logitech Z120 USB powered speakers: http://www.amazon.com/Logitech-Stereo-Speakers-Powered-980-000524/dp/B004ULOZPQ

Sabrent USB 2.0 USB sound card dongle:
http://www.amazon.com/Sabrent-Virtual-External-Surround-USB-AUDD/dp/B00D69U1B0/


Monday, October 14, 2013

Chromebook, a kid's first computer.


That is my 5 year old sitting on his future to-be inherited "Tony Stark" Eames lounger with his kiddie laptop, an Acer Chromebook. That is his place to lounge and pretend he is like dad. Robert Downey Jr's lounger in Iron Man 3 was a fake replica, this is a real deal but is this chromebook a real laptop or just another wannabee kiddie toy? Lots of people have a prejudice against a limited "cloud-only" based device like the Chromebook, myself included. I may not be the intended audience for this device but I figure school grade kids might find this "kiddie" laptop useful. This post is about how my kid uses his junior laptop.

For my use, the Chromebooks (both my Samsung and the Acer) are fairly limited except for the casual browsing of the Craigslist classifieds while I am lounging.  For my son, it is his real computer. So he thinks! He's been doing his kindergarten homework (Flash based) and he watches youtube video of Gangham style Star Wars music videos. I gave him the Acer model because, well, I like the Samsung more. I doubt he will ever need to use it more than the three hour at a time run-time on the Acer. Plus, it has a 320GB hard drive that I can fill it up with cartoons in MP4 format for off-line viewing. Hence, the Acer is a better fit for him.

You can't go wrong with these Chromebooks for a five year old. They cost around $100-140 refurb. Basically, if they break, you won't make a big fuss about it. Unlike a cheap Android tablet, Chrome OS doesn't have the thousands of useless mind numbing games to keep my kid pre-occupied. The most damage he can do is venture into some questionable youtube videos on his own. He is five so he can barely read. I doubt he will do any damage by going to the internet on his own. I have a few bookmarks of where he needs to go and he can click away to "play" with his assigned homework from school.

ChromeOS and Chromebooks are suitably perfect for a five year old. Hence, you can't really call it a "replica" or fake computer. I think of it as a computer with training wheels. I've have to reset and restore the device a few times. However, after a factory reset, the Chromebook is back and running in a few minutes. No lengthly re-installs. Developer mode for hacking is ill-advise for a kid who can barely read the dialogues. 

In the past, I've tried a few kid's specific Linux distros, the OLPC build, and even a locked down OSX Parental control account on the mac with a locked down dock. With all of those, my kid still figures a way to do some damage like pulling out the bootable USB stick or memorizing my passwords (by looking over the shoulder) which enables him to login into my desktop. With Chrome OS, he has his own account and it is pretty much fool-proof. Again, this is design is child-friendly.

Once in a while, the wireless would cut-out. Sure, this would piss most people off but it doesn't bother me so much because it cuts into his computer time. Another good reason to check on what he is doing. I simply disable and re-enable the Wi-Fi and he is back to using it.

Now, a computer with just homework is simply no fun. Sure there are games on the Chrome store but they pretty much stink. My son also has an iPod touch and he prefers that for gaming Cut the Rope. We let him play with his iPod touch 1-2 hours a week on the weekends. With the Chromebook, the only source of entertainment is to watch curated videos. The Acer does have 320GB of storage and I could copy movies at random but I found just using Plex, my life becomes a whole lot easier.

There is no dedicated Plex app for Chrome OS but the web interface works just fine. Both the Samsung and Acer can stream up to 1080p videos and for the type it can't stream, my PLEX server transcodes.

With Plex, I just type in the URL , http://[IP Address of PLEX server]:32400/web , and he uses the web client as you see below.


So far, this works pretty good in my household. My kid doesn't have a bookmark and doesn't know the address of the PLEX server so I have to enter it in for him. This way, I can keep check on his usage. I'm sure when he is around 7-8, he'll figure it out on his own. He hasn't drop his laptop yet and I'm not really worried about it. If he does break it, it will be a good lesson in responsibility. He thinks it is expensive and I don't want to tell him otherwise so he is extra careful. It is his own device and he takes pride in ownership. Unlike the iPads and other tablets in the house, this isn't a shared device. He owns it and is responsible for it like remembering to charge it.

I should be getting my MIIPC in shortly if they ever ship it but for now, the Acer Chromebook makes my little man feel like he is just like his dad - a geek.

Here is the desk of a five year old future geek.


Now back to Tony Stark, that Eames Lounge and Ottoman is a Plycraft replica by just looking at the head-rest and foot base. My son brought that up. He'll grow up to be a watch and furniture snob just like his dad.


Saturday, October 12, 2013

INTEL NUC and OpenELEC (XBMC) HTPC

After getting my INTEL NUC, I decided to install openelec (a Linux distro that just runs XBMC).

I chose openelec because I was building this for a 70 year old in-law with no experience with computers whatsoever. I built an E-350 AMD Foxconn build almost six months ago for my computer illiterate 80 year old dad. He has been using it ever since with no problems. He is 80 and has zero, absolutely zero experiences with any computers whatsoever. Hence, openelec with a remote control is a no brainer. Moreover, there are a few video add-ons that make openelec into an IPTV (IP based TV) that gets foreign tv programming. I am currently paying a few dollars a month to comcast for these channels and a separate satellite for free terrestrial foreign TV will cost me around $500. This build pretty much make sense for my use case.

It was basically a 10 minute install. I downloaded the INTEL x64 build, popped in 4GB of RAM I had lying around, plugged in HDMI, plugged in keyboard and booted into the installer. Voila, 10 minutes later, I had a build. Once installed, I no longer need a keyboard to function as I will only be using a remote control with it.

Here is a picture to give you an idea of how small this thing is compared to a third generation AppleTV. The wire below is the USB infrared sensor for the remote. As for USB storage, you only need 1GB for the entire OS. Hence, any old USB stick lying around would work.


The key ingredient to a successful openelec appliance is the remote. If you use a wireless keyboard, a 60-80 year old won't figure it out. However with a decent remote control, you can teach them to navigate. For my dad and his old friends, it works.
I got a few of these Windows Media Center MCE usb remotes from amazon.com. They go for around $8-13.

With a remote, you no longer have a "computer" for those lay folks. Rather, it now becomes an "appliance."


Installation is rather straightforward. Plug in ethernet, HDMI, micro USB, USB for remote and power.

One thing that I forgot to mention earlier, INTEL does not supply the AC mickey mouse three head cable. They provide the power supply but no $3 cable which is strangely odd. I happen to have a few spare ones lying around.


Once you boot into openelec, the installation is pretty straightforward and the whole install took less than 3 minutes even with an old slow USB stick. I didn't want to add any cost to this (e.g. install an MSATA SSD) and booting into USB is still very quick. The whole OS boots in less than 30 seconds. I spent more time plugging in the cables and looking for a spare keyboard for the install.


In my TV stand, the NUC is now in the middle of an AppleTV and a 4 year old Western Digital WDTV media player. Again, these pictures are for reference in regards to how small this device is.


I installed a few add-ons and activated a few things. For example, the Plex-XBMC plugin works like a charm. This device now pulls from my Plex media server and all the video is served from the remote. I still have a free USB port in the front if I want to plug in a USB drive or stick for movies. XBMC also have UPnP, SAMBA sharing and even Apple AirPlay receiver support.

The openelec build is strictly network based. With a 1GB usb stick, I don't need to store anything locally. This HTPC is going into the guest room so my guests (the inlaws) can easily pull up programming and video on-demand.


I have to say, it has been working very good even for a "Celeron" 847 1.1 GHZ build. I haven't encountered any heating issues. So far, it is doing it's job very well. I can play 1080p HD content through the network and locally. I've even thrown a few 10GB MKVs and it was able to play with no sweat. My earlier Foxconn AMD E-350 build often struggled with larger MKV files whereas this one didn't. I'm sure the higher clocked i3 models would do better but for my needs, this processor set-up works admirably. There has been a few times where a few of the 3rd party "add-ons" I've been using have locked up the machine but a hard reset usually solved the problem.

The great thing about this is power consumption:

1.2W when the machine is off.
IDLE is roughly 14W and playing video (720P and 1080P) is any where from 14 to 18 Watts.


So there you have it. The INTEL NUC is a pretty good XBMC box.  I'm sure you can probably do a few cool things with this box. It is basically just a computer and everyone I know have been incredibly surprised. They ask, "is that another media player, streamer or Android set-top box?" I reply, "nope, just another computer." And when I tell them these are easily hackintoshable, their eyes light up. I probably won't go there with this but I think I'm going to get another one just to mess around with for myself.


Link: openelec INTEL build.


Friday, October 11, 2013

INTEL NUC. Real quick impressions.

Here we have an INTEL NUC (Next Unit of Computing). This is a super duper small micro pc or SFF (Small Form Factor) gadget. This doesn't even use a standard at all like pico or micro-itx. Rather, it is INTEL's jab at making the smallest footprint PC in a barebone package.

This is what you get. A 4X4 motherboard with a mini-PCIe slot (for Wifi), mSATA for storage, Ethernet, two HDMI, and three USB. Some models come with Thunderbolt that replaces the Ethernet.

I got the cheap Celeron 847 which is good enough for my use: HTPC 1080p IPTV video playback. Here are my quick impressions. I'm going to install OpenELEC or something like that on this device in the next few days.


Here is how small it is. It is in the middle of a 2.5" portable hard drive, a Rolex wristwatch and mouse. That is how small it is! Tiny!


The back.


The sole USB port in the front.


The guts. I have some spare parts in my workshed I will be using on this. Hence, I will be working on this in the next few days.


One word. Amazing little piece of machinery. A Full computer this small.


Wednesday, October 9, 2013

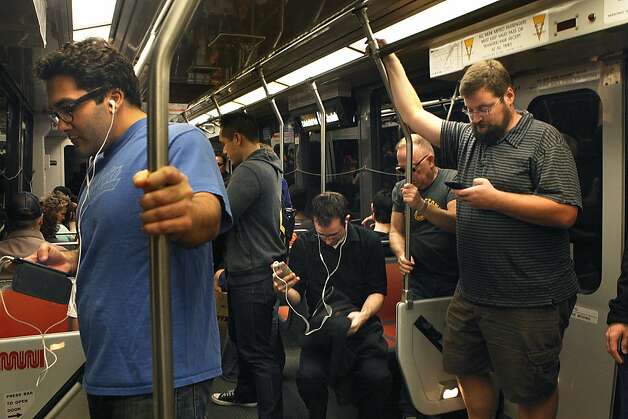
Sad state of Affairs. People too absorb with gadgets, they didn't notice a gunman


In my hometown, the local paper, the SF Chronicle just publish a news report about a gunman yielding his gun on a crowded rail train, Muni. Everyone was so consumed with their smartphones and tablets, no one even notice the gunman. The surveillance camera picked up the gunman.

Here is a quote from the article:

He raises the gun, pointing it across the aisle, before tucking it back against his side. He draws it out several more times, once using the hand holding the gun to wipe his nose. Dozens of passengers stand and sit just feet away - but none reacts.
Their eyes, focused on smartphones and tablets, don't lift until the gunman fires a bullet into the back of a San Francisco State student getting off the train.
Investigators say this scene was captured by a Muni camera on Sept. 23, the night Nikhom Thephakaysone, 30, allegedly killed 20-year-old Justin Valdez in an apparently 

Such a sad state of affairs that our generation is oblivious to the dangers around them.


Link:
http://www.sfgate.com/crime/article/Absorbed-device-users-oblivious-to-danger-4876709.php#page-1

Tuesday, October 8, 2013

My Airport Music Streaming set-up


I finally set-up my Airport streaming set-up and I like to share it with my readers. Overall, I am pleased how it turned out.

Apple Airport allows you to stream wirelessly from iOS or Macs to a variety of wireless speakers and sound systems. I have various speakers in different parts of the house and this now changes the way I listen to music. Using Wi-Fi, you don't have to worry about range issues and the sound quality far exceeds bluetooth.


By default, iOS devices can only stream to one devices. When you play a song, you can pick which remote speaker to listen to. This by itself is cool but the cool part comes with multiple, simultaneous streams.


Desktop Macs and PC's running iTunes can stream to multiple speakers simultaneously all at the same time. If you have a dedicated iTunes server running, you can make up for iOS's single speaker deficiency by using the iOS devices as a remote control. As a remote, you can stream to multiple speakers in multiple rooms.


Here, I have the computer, the speakers in the basement, dining room, and master bedroom all playing at different volumes. This is simply brilliant!


This is why I love the Airplay protocol. I can walk from floor to floor, room to room, and all hear the same music in my 3 story house. I can initiate a stream in my Master bedroom and walk across multiple rooms and hear all the same track. 


The first speaker I have is the Klipsch Gallery G17 Air. I use this in my bedroom because it covers a decent size area. I originally had this in the living room but decided I want speakers with more "stereo" soundstage separation in the living room. A majority of these portable speakers suffer one thing: lack of sound stage and most of them sound mono to me. When you are up close, they sound great but the farther you get, you realize you lose stereo separation. The Klipsch uses a bass reflex enclosure so the sound is very "punchy" for being a small set of speakers. Don't get me wrong, they do sound very good. These once retailed closed to $500 and have been compared to the Bowers and Wilkins Air Zeppelin. I would say these are one of the better small wireless speakers you can get on the market.
For the bedroom, they work fine. I also alternate between airplay mode and direct line mode to my iPod classic.


The next system is the Sony DLNA compatible SA-NS500 portable wireless speaker. This is a unique cylinder cone design. The top acts as a handle and it is great for lugging around because it has one trump card - batteries for 5-6 hours of portable sound. I normally leave it in the Dining room but I often take it outside to keep me company when I am washing and waxing the car on the weekend.

The shape is designed to punch sounds indifferent direction. It has 4 30mm two way speakers and a small 110mm sub woofer.


Again, the Sony is a good sound speaker but you won't get any soundstage. Early reviews were mixed on this but with later firmware revisions, Sony worked out most of the kinks. This also supports DLNA.


My next set-up is a not really a speaker system. Rather, a converted PogoPlug running ArchLinux and shairport. I had a spare PogoPlug and a few older 2.1 computer speakers. I figure I throw it in my basement and it works pretty great. Open source hackable solution. All you need is a USB sound card, some speakers, and ArchLinux running on these PogoPlug. I will probably build some more PogoPlug "Airplay" receivers that will expand my speaker lineup. You can read about it here.

I also have an AppleTV connected to my  TV and sound system but I really don't use it for audio Airplay streaming chores.

Lastly, the living room. I thought long and hard on this. I shopped around and looked at a few options. I really didn't want to put a stereo system in the living room because I wanted it to be minimalist as much as possible. However, I spend a lot of time in there relaxing and lounging. I seriously considered the Bowers and Wilkins A5 and A7. Price wasn't really an issue as I spent quite a bit of money furnishing the living room already. The problem withe the Bowers and Wilkins' A7 is the same with the Klipsch, Sony and myriad of other "Airplay" enable speakers. They all lack soundstage and stereo imaging. Your left and right speakers should ideally be a few feet apart (say 6 feet) to have any stereophonic effect. Most of the music I listen to, 80s and 90s music, are heavily mixed with stereo effects. I also listen to a lot of live concert recordings.


The solution I came up was an Apple Airplay Express plus the well reviewed and acclaimed AudioEngine A5+ speakers. The AudioEngine is a good midrange $400 studio monitor quality speakers. This is a popular home-brew Airplay set-up and I now know why it is popular. They sound amazing.


For now,I don't have the DAC (Digital to Analog Converter) but I plan to add that in a few weeks. This is by far, one of the better solutions out there even without an added DAC. I wanted clear, accurate sound. For the price, the A5+ are amazing. They don't have that artificial bassy, hyped sound. Just go on Google and read up on the AudioEngines, they are amazing powered speakers for the price. This is what I ended up and I'm very satisfied. 

So there you have it. This one geek's streaming audio home set-up.


Links: